Want to grow new ZZ plants at home without spending a rupee? A single healthy ZZ plant can eventually give you several new plants for empty corners, tabletops, or even thoughtful gifts. ZZ plant propagation is easier than most people expect. If you’re wondering how to propagate a ZZ plant, there are three proven methods to choose from: leaf cuttings, stem cuttings, and root ball division.
Division is the fastest, new growth appears within weeks. Stem cuttings are the most beginner-friendly, rooting in 4–8 weeks. Leaf cuttings work well but demand patience, expect 6–12 months before visible growth above soil.
When Is the Best Time to Propagate ZZ Plant?
Spring and early summer are ideal. The plant is actively growing, which means faster root development and better success rates. Growth also depends on receiving the right amount of indoor light throughout the year. Propagation works year-round, but autumn and winter cuttings are noticeably slower as growth nearly pauses in cold months.
What You’ll Need to Propagate ZZ Plants
ZZ plant propagation doesn’t require specialized equipment, most of it is already at home.
Tools Required for ZZ Plant Propagation
- Sharp, sanitized scissors or pruning shears
- Clean glass container or jar (for water propagation)
- Pot or propagation tray with drainage holes
- Rooting hormone (optional, speeds up root development)
- Terracotta or plastic pot for transplanting
Why sanitize? Dirty tools transfer bacterial and fungal spores directly into the cut, one of the most common and avoidable causes of rot.
Best Potting Soil for ZZ Plant Propagation
A simple DIY mix works perfectly:
- 2 parts potting soil — nutrients
- 1 part perlite — aeration and drainage
- 1 part coarse sand or orchid bark — prevents compaction
3 Proven Ways to Propagate ZZ Plant
| Method | Speed | Difficulty | Success Rate | Best For | First Roots |
|---|---|---|---|---|---|
| Leaf Cuttings | Slowest | Easy | Moderate | Patient beginners | 2–6 months |
| Stem Cuttings | Medium | Easy | High | Most beginners | 4–8 weeks |
| Root Ball Division | Fastest | Moderate | Very High | Large, crowded plants | 1–2 weeks to settle |
Which ZZ Plant Propagation Method Is Best?
The right method depends on what you need and what you’re starting with.
Best for beginners
Stem cuttings — faster than leaf cuttings, forgiving of small mistakes, and work well in both soil and water.
Fastest method
Root ball division — established roots and rhizomes produce new growth within weeks.
Most reliable
Root ball division has the highest success rate; each section already has a functioning root system, a point also noted by the Michigan State University Extension propagation guide.
Least disruptive to the parent plant
Leaf cuttings — take one or two leaves without touching the roots.
Best for large ZZ plants
Division — the only practical option when a plant has outgrown its pot.
Best for gift plants
Division or stem cuttings — both produce a full-looking plant within months. Leaf cuttings take too long to look presentable.
They’re also a practical option for people looking to add more greenery to darker areas of the home.
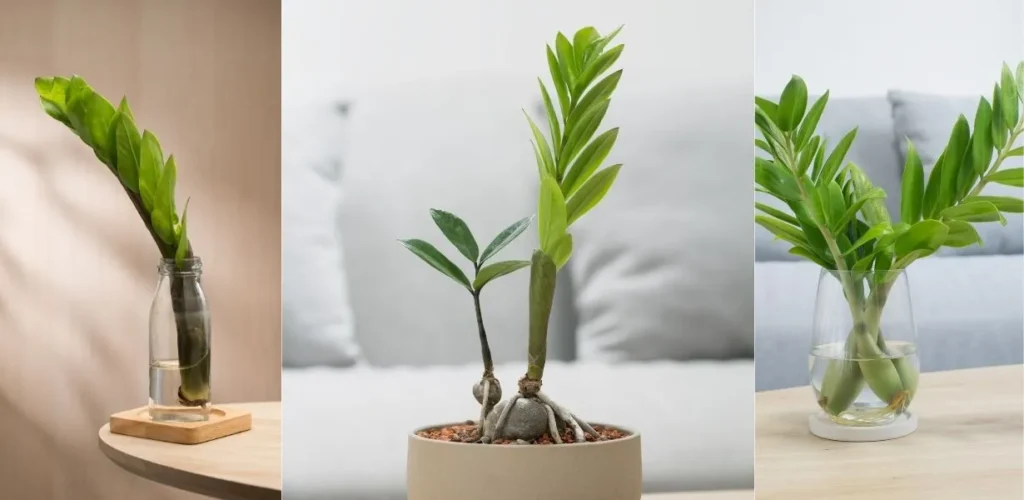
ZZ Plant Propagation in Water
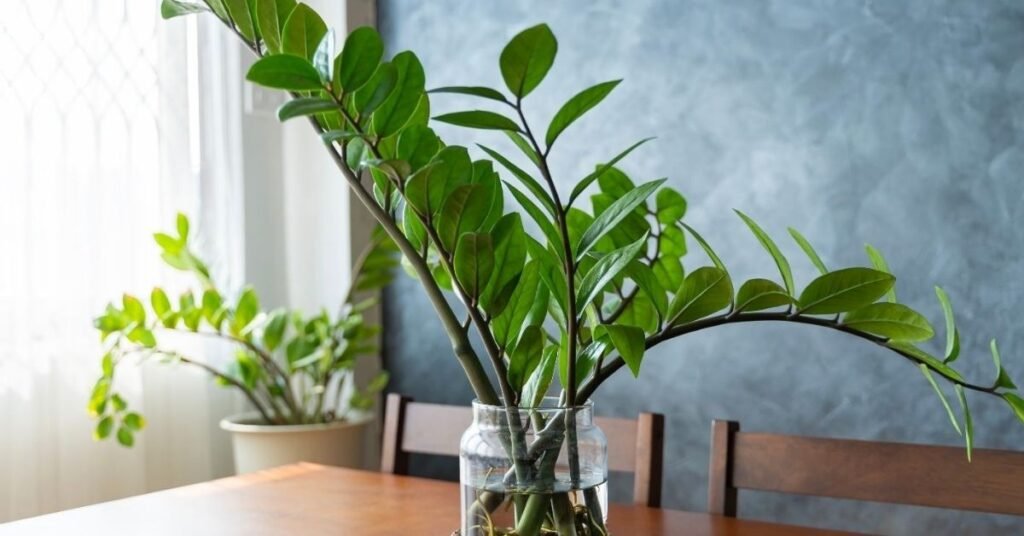
Water propagation lets you watch roots develop in real time, which makes it a popular choice for beginners. However, ZZ plants aren’t suited to permanent water growing. Their underground rhizomes are designed to store water, not remain submerged for long periods. That said, water propagation works well for encouraging root development before transferring cuttings to soil.
Understanding the needs of drought-tolerant indoor plants helps explain why excess moisture often causes problems.
Quick Answer — Can You Propagate ZZ Plant in Water?
Yes. Place a healthy stem cutting in clean water with the cut end submerged and the leaves above the waterline. Keep it in bright indirect light and replace the water every 5–7 days. Roots typically appear within 4–8 weeks. Once they reach 2–5 cm long, transplant the cutting into well-draining soil.
How to Propagate ZZ Plant Cuttings in Water
Step 1: Choose a healthy stem with at least 2–3 leaves and no signs of damage or yellowing.
Step 2: Cut the stem using clean, sterilised scissors.
Step 3: Let the cut end air-dry for 30–60 minutes so a callus forms. A callus is a dry, sealed layer of cells over the wound that helps prevent rot.
Step 4: Place the stem in a clean glass of room-temperature water. Submerge only the cut end and keep all leaves above the waterline.
Step 5: Place the Plant pot in bright indirect light at temperatures between 18–30°C. Understanding how indoor light affects plant growth and rooting success can help improve propagation results.
Step 6: Refresh the water every 5–7 days to prevent bacterial buildup.
Step 7: Once white, healthy roots reach 2–5 cm long, transplant the cutting into well-draining potting soil.
Step 8: Water lightly after planting and keep the soil slightly moist for the first few weeks while the cutting adjusts.
Important: Once roots reach 2–5 cm long, transplant the cutting into soil without delay.
Water vs Soil Propagation: Which Is Better?
| Factor | Water Propagation | Soil Propagation |
|---|---|---|
| Root Strength | Weaker (water-adapted) | Stronger (soil-adapted) |
| Speed | Moderate | Slightly faster overall |
| Success Rate | Good for stem cuttings | Higher, especially for leaves |
| Maintenance | Refresh water weekly | Check moisture every few days |
| Beginner Friendliness | Easy to monitor | More natural process |
Bottom line: Both methods work well. Water propagation is ideal if you want to monitor root development, while soil propagation generally produces stronger roots and requires less maintenance over time.
ZZ Plant Leaf Propagation (Water & Soil)
A single leaf can grow into a complete ZZ plant, but it’s the slowest propagation method. Understanding what happens below the soil surface makes the long wait much easier to manage.
What Is a Rhizome?
A rhizome is a fleshy, tuber-like underground stem that stores water and nutrients. When you propagate a ZZ plant from a leaf, a new rhizome develops first. The new plant grows from this rhizome rather than the original leaf, which is why leaf propagation can appear inactive for months.
Quick Answer — Can You Propagate ZZ Plant From a Leaf?
Yes. Plant a healthy ZZ leaf in well-draining soil or place it in water with the stalk end submerged. A new rhizome forms underground over 2–6 months, followed by roots and new shoots. Visible growth above the soil surface usually takes 6–12 months or longer.
How to Propagate ZZ Plant from Leaves
You can propagate ZZ plant from leaves in either soil or water. Soil propagation is generally more reliable and produces stronger roots, while water propagation allows you to monitor root and rhizome development more easily. Both methods require patience, as ZZ plant propagation from leaf is much slower than stem cuttings or division.
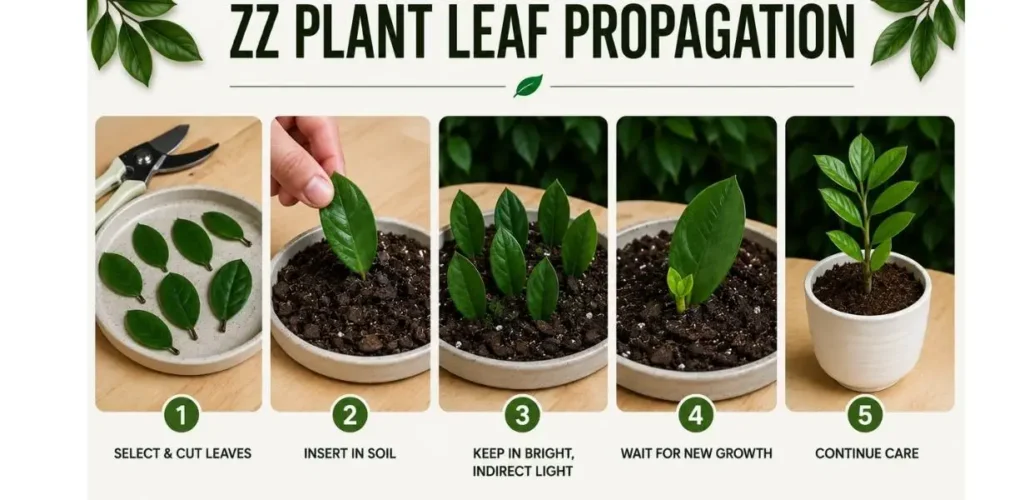
Leaf Propagation in Soil
Step 1:
Choose a healthy, firm, dark green leaf with no soft spots or discolouration.
Step 2:
Cut the leaf at the base with a sharp blade, keeping a small section of stalk attached. This is where the rhizome will form.
Step 3:
Optionally dip the cut end in rooting hormone powder.
Step 4:
Allow the cut end to air-dry for about an hour so a callus can form.
Step 5:
Insert the cut end 1–2 cm deep into a shallow tray filled with well-draining potting mix.
Step 6:
Water lightly and place the tray in bright indirect light at temperatures between 18–30°C.
Step 7:
Keep the soil barely moist. Once new growth appears above the soil, the rhizome has formed and the plant can be moved to its own pot.
Leaf Propagation in Water
Step 1:
Place the stalk end of a healthy leaf into a small glass of clean water, keeping the leaf above the waterline.
Step 2:
Keep the container in bright indirect light at temperatures above 18°C. Providing the right environment is just as important as choosing the correct propagation method, especially for low-maintenance indoor plants grown in low light.
Step 3:
Replace the water every week to prevent bacterial buildup.Spring and early summer are ideal. The plant is actively growing, which means faster root development and better success rate
Step 4:
Once a small white rhizome develops at the base and reaches 1–2 cm, transfer it to well-draining soil.
How Long ZZ Plant Leaf Propagation Takes
- Callus formation: 1–2 weeks
- Root formation: 6–10 weeks
- Rhizome development: 2–6 months
- Visible new shoot: 6–12 months or longer
ZZ Plant Propagation From Stem Cuttings
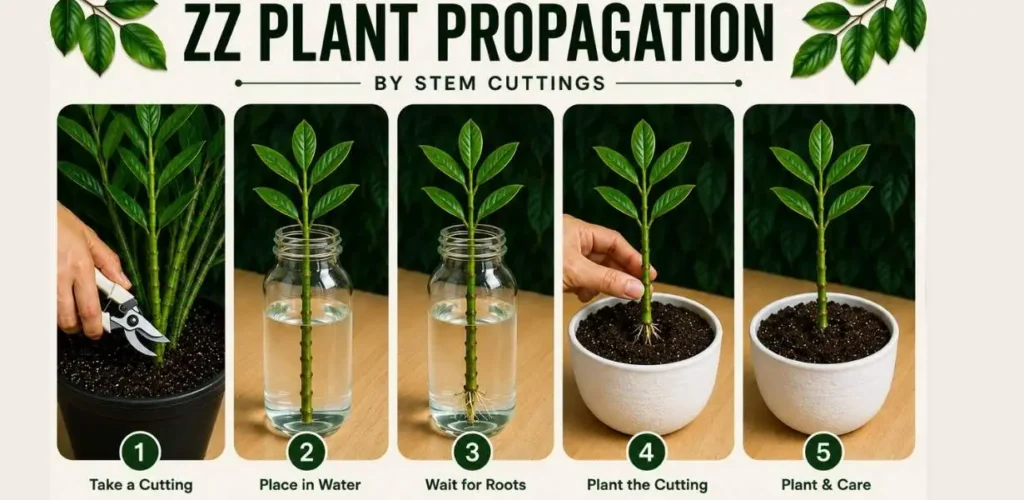
Stem cuttings are the most popular ZZ plant propagation method because they’re faster than leaf propagation, more forgiving of beginner mistakes, and suitable for both soil and water. In my experience, a stem with 2–3 healthy leaves consistently roots faster and produces stronger growth than single-leaf cuttings. The same approach is widely used when propagating spider plants from cuttings and plantlets.
How to Propagate ZZ Plant From Stem
Step 1:
Choose a healthy stem with 2–3 firm, dark green leaves and no signs of damage or yellowing.
Step 2:
Cut the stem cleanly at the base using sterilised scissors or pruning shears.
Step 3:
Allow the cut end to air-dry for about an hour so a protective callus can begin to form.
Step 4:
Optionally dip the cut end in rooting hormone powder to encourage faster root development.
Step 5:
Insert the lower 2–3 cm of the stem into a pot filled with well-draining potting mix.
Step 6:
Water lightly until the soil is evenly moist, then place the pot in bright indirect light at temperatures between 18–30°C.
Step 7:
Allow the top layer of soil to dry slightly between waterings throughout the rooting period.
Stem Cutting Propagation in Soil vs Water
Both methods work well, but if you’re new to ZZ plant propagation, water propagation makes it easier to track root growth and spot problems early. Soil propagation requires less ongoing maintenance and usually produces stronger roots that adapt better after transplanting.
ZZ Plant Propagation by Root Ball Division
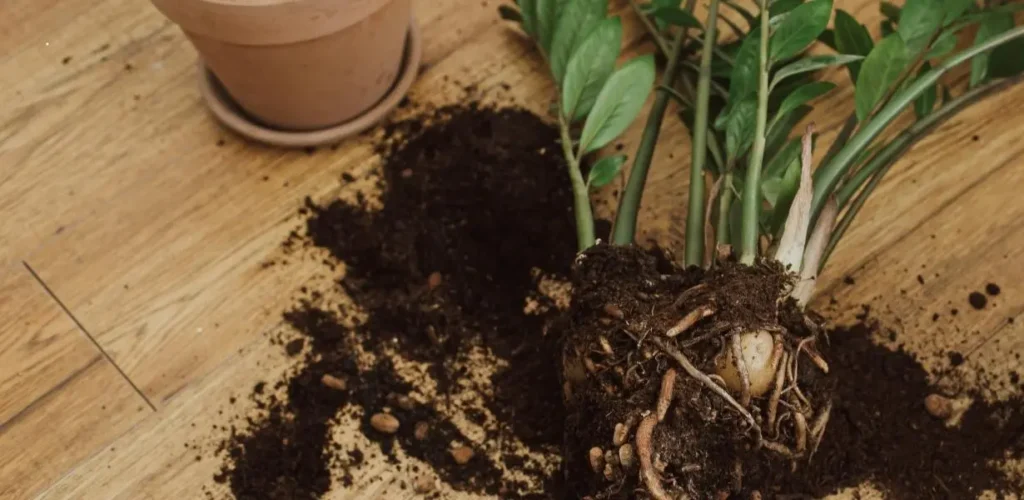
Root ball division is the fastest and most reliable propagation method. If you already have a large ZZ plant and don’t want to wait months for cuttings to root, the division method gives you established plants almost immediately because each section already has its own roots, rhizomes, and stems.
Division is also one of the most effective ways of propagating peace lilies and other clumping houseplants.
How to Divide a Large ZZ Plant
Step 1:
Water the plant the day before dividing it. Slightly moist soil is easier to separate and helps reduce stress on the roots.
Step 2:
Gently tilt and squeeze the pot to loosen the root ball, then slide the plant out from the base.
Step 3:
Brush away excess soil so you can clearly see the roots and rhizomes.
Step 4:
Look for natural separation points where the rhizomes branch apart and carefully divide the plant into smaller sections.
Step 5:
Make sure each section has at least one or two stems, healthy roots, and part of a rhizome. Divisions without a rhizome are much less likely to establish successfully.
Step 6:
Plant each division in its own pot filled with fresh, well-draining potting mix. Water lightly and place it in bright indirect light while the plant settles into its new pot.
Following proper ZZ plant care after propagation helps new divisions establish more quickly.
Realistic Expectation:
Newly divided ZZ plants may look sparse or slightly stressed at first. Give them 4–6 weeks to settle before expecting noticeable new growth.
When Division Is the Best Method
Division is usually the best option when a ZZ plant has become overcrowded in its pot or when you want several established plants without waiting months for cuttings to develop roots. It’s also ideal during spring and early summer, when active growth helps the plant recover more quickly.
How Long Does ZZ Plant Propagation Take?
ZZ plant propagation can take anywhere from a few weeks to over a year, depending on the method. Root ball division is the fastest, stem cuttings usually produce roots within 4–8 weeks, while leaf cuttings may take 6–12 months before visible growth appears above the soil.
Root Ball Division: New growth often appears within a few weeks.
Stem Cuttings: Roots usually develop in 4–8 weeks, with new shoots appearing in 3–6 months.
Leaf Cuttings: The slowest method. New growth may take 6–12 months or longer.
Factors That Affect ZZ Plant Propagation Success
If your ZZ plant cuttings aren’t rooting or seem stuck for months, growing conditions are usually the reason. Light, drainage, watering, and temperature have the biggest impact on how quickly roots and rhizomes develop.
Light
Bright indirect light produces the fastest results. Too much direct sun can scorch cuttings, while very low light often leaves growers wondering why nothing seems to be happening for weeks or even months.
Soil Drainage
Good drainage is essential because ZZ plant cuttings rot much more easily in soggy soil than mature plants. If excess moisture remains around the roots for too long, propagation often fails before new roots have a chance to develop. Similar drainage issues are responsible for many common snake plant growing problems indoors.
Watering Habits
Overwatering is the top reason propagation fails. Let the top 1–2 cm dry out between waterings. Every 5–7 days is usually enough. Learning to recognize the early signs of overwatering in houseplants can help prevent root rot before it starts.
Temperature and Season
Warm conditions help roots develop much faster. ZZ plant cuttings root best between 18–30°C. Below 15°C, root development slows significantly and may stop altogether.
Expert Tips for Faster ZZ Plant Propagation
Many beginners treat ZZ plant cuttings like fast-rooting tropicals, overwatering and disturbing them constantly. ZZ plants reward patience and restraint. These grower-level tips make a real difference:
- Use rooting hormone: Dipping the cut end in powder stimulates callus formation and can cut rooting time by several weeks
- Manage temperature carefully: Keep consistently above 21°C. Cold windowsills at night stress the cutting without any visible sign, temperature swings are a silent propagation killer
- Improve soil aeration: A perlite-heavy mix lets oxygen reach developing roots and speeds up root establishment significantly
- Optimise light: Bright indirect light is the sweet spot. Direct sun on a cutting dehydrates it before roots can support water uptake
- Control humidity for leaf cuttings: A clear plastic bag loosely over a leaf cutting creates a humid microclimate that accelerates rhizome formation — open it daily to prevent mold
- Leave it completely alone: Those first fragile roots tear instantly when the cutting is pulled out. Plant it, mark the date, and don’t check for at least 6 weeks
Signs ZZ Plant Propagation Is Working
One of the most frustrating parts of ZZ plant propagation is that most of the progress happens underground. These signs usually indicate that roots or rhizomes are developing successfully.
Stem or leaf stays firm and green, not soft, brown, or wilting
Cutting resists a very gentle tug, roots are anchoring it
Small white rhizome visible at the base (especially clear in water propagation)
New tiny shoots emerge at or near soil level
Weeks have passed with no rot, collapse, or foul smell
Signs ZZ Plant Propagation Is Failing
Not every cutting survives. If you notice any of the warning signs below, act quickly to improve the chances of recovery.
Stem or leaf feels soft, mushy, or slimy at the base.
Cut end has turned black or dark brown.
Foul smell coming from soil or water.
White or grey mold spreading across the soil surface.
Cutting collapses and pulls out with no resistance.
Yellowing spreading rapidly to all leaves, not just one or two lower ones
ZZ Plant Propagation Problems (And Fixes)
| Problem | Most Likely Cause | Solution |
|---|---|---|
| Cuttings not growing | Still within normal rooting timeline | Allow more time; ZZ cuttings take weeks or months |
| Stem or leaf rotting | Excess moisture around cutting | Improve drainage and reduce watering |
| No roots forming | Unhealthy cutting or poor conditions | Keep warm and restart with healthy material |
| Black or mushy base | Fungal rot | Trim, callus, and restart |
| Yellow leaves | Adjustment stress or watering issues | Monitor moisture, remove damaged leaves |
| Mold on soil | Poor airflow | Increase ventilation, let soil dry |
| Weak growth | Insufficient light or poor soil | Move to brighter indirect light, refresh mix |
| Cutting collapses | Failed root development | Remove rot and restart propagation |
ZZ Plant Propagation Mistakes to Avoid
Checking too often — pulling a cutting out to check for roots can tear fragile new growth and set propagation back by weeks.
Skipping the air-dry step — allowing the cut end to callus for 30–60 minutes greatly reduces the risk of rot.
Starting with a damaged cutting — soft, yellowing, or unhealthy stems and leaves rarely propagate successfully.
Overwatering — constantly wet soil is one of the most common reasons cuttings fail before roots develop.
Placing cuttings in direct sun — leaves can lose moisture faster than the cutting can replace it, leading to stress and failure.
Why ZZ Plant Cuttings Rot
ZZ plant rhizomes and stems are built to store water. When the surrounding soil is also constantly wet, the tissue becomes anaerobic and fungal decay sets in fast. This makes ZZ plants more rot-prone than many houseplants despite being drought-tolerant — their water-storing tissue becomes a liability in wet conditions.
Why Leaves Turn Yellow During Propagation
A few yellow lower leaves during the first few weeks are usually normal because the cutting is redirecting energy to root development. If yellowing spreads to all leaves and stems are also turning soft, that’s overwatering or root rot, not adjustment stress.
When and How to Repot Propagated ZZ Plants
Repot once you see new surface growth or roots peeking through the drainage holes, typically 3–5 months for stem cuttings, 6–12 months for leaf cuttings. Moving a cutting into a larger pot too early often slows establishment and increases the risk of overwatering.
How to Repot Without Causing Transplant Shock
- Choose a pot only 1–2 sizes larger, too big holds excess moisture and increases rot risk. The same principle applies when repotting rootbound houseplants into larger containers.
- Ease the plant out sideways — never pull by the stems.
- Trim any dark, mushy roots with a clean blade.
- Fill the pot with fresh, well-draining potting mix, keeping the soil loose rather than compacted. Water lightly after planting.
- Keep in bright filtered light for 2–3 weeks while the plant adjusts.
Warning — Transplant Shock: Drooping or a pause in growth for 2–4 weeks after repotting is completely normal. Keep conditions consistent, warmth, indirect light, light watering and the plant will settle on its own.
Can you propagate ZZ plant in water successfully?
Yes. ZZ plant stem cuttings root well in water when kept in bright indirect light. Replace the water every 5–7 days and transplant the cutting into soil once roots reach 2–5 cm long. Avoid growing ZZ plants permanently in water, as their rhizomes are prone to rot when submerged for extended periods.
How long does it take to grow new roots on a ZZ plant cutting?
Stem cuttings typically develop visible roots within 4–8 weeks. Leaf cuttings take much longer, often requiring 2–6 months before roots and rhizomes form underground. Root ball division is the fastest method because the roots are already established.
How do I know if my ZZ plant propagation is working?
Healthy ZZ plant cuttings stay firm and green while developing roots. A gentle tug should meet slight resistance, indicating roots are anchoring the cutting. In water propagation, white roots become visible at the base, while new shoots emerging from the soil confirm successful rhizome development.
How do I care for a newly propagated ZZ plant?
Keep newly propagated ZZ plants in bright indirect light and use a well-draining potting mix. Maintain temperatures above 18°C and water only when the top 2–3 cm of soil feels dry. Avoid fertilising for the first 4–6 weeks while the roots establish.
What is the fastest way to propagate a ZZ plant?
Root ball division is the fastest ZZ plant propagation method. Each divided section already contains roots, rhizomes, and stems, so there is no waiting period for rooting. Under suitable conditions, new growth often appears within a few weeks.
Conclusion
ZZ plant propagation isn’t difficult, but it does require patience. Stem cuttings are the best choice for most beginners, root ball division delivers the fastest results, and leaf cuttings reward growers who don’t mind waiting longer. Start with healthy plant material, provide bright indirect light, avoid overwatering, and give the roots time to develop. With the right conditions, a single ZZ plant can eventually produce several healthy new plants.
Explore more:
Muddsir Munir
Houseplant enthusiast researching and writing about indoor plants, helping beginners grow spider plants, snake plants, and more with confidence.