
Reviewed by: Muddsir Munir
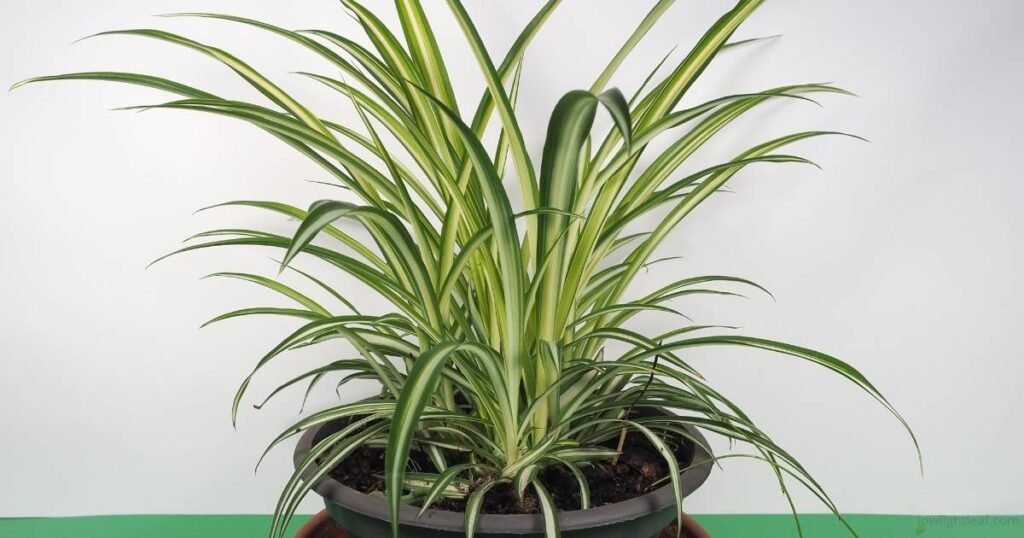
Want to fill your home with easy-to-care plants? Let’s propagate a spider plant. Understanding how spider plant propagation works, when to start, and which method to use makes the process simple and highly successful, even for beginners. Spider plants are known for their resilience and adapt well to most indoor environments. Spider plants are commonly propagated using their baby plantlets, which respond well to propagation when moisture and light remain balanced. Propagating spider plants is a practical and affordable way to expand your indoor greenery without buying new plants. With the proper method, these baby plants establish new roots under proper conditions and gradually develop into healthy, full-sized spider plants.
If you’re trying to understand what spider plant propagation involves and how to propagate a spider plant correctly, this guide covers the complete process. It explains the different propagation methods, when to use each one, and how to support healthy root development so new plants establish successfully.For long-term success, following a proper spider plant care guide is equally important.
What is spider plant propagation?
Spider plant propagation is the simple process of growing new spider plants from spiderettes, the baby plants produced by a mature spider plant, a natural growth method also explained by university-based horticulture sources such as the University of Wisconsin Madison Extension.
If you’ve owned a spider plant for about a year, you may have noticed small baby plants hanging gracefully from the mother plant. These spiderettes develop on long runners called stolons, which form once the plant reaches maturity and receives proper light and care. This natural growth process allows spider plants to multiply easily under indoor conditions.
How Do Spider Plant Spiderettes Form?
When a spider plant matures and receives proper light and care, it begins producing long runners, or stolons. Tiny spiderettes form at the ends of these stolons. Once developed, they can be propagated by rooting them in water or soil, or by placing the spiderette directly onto the soil while it remains attached to the mother plant. This method is also commonly used in trailing plants like pothos, as explained in the pothos propagation guide.
Best Time for Spider Plant Propagation
The best time to propagate a spider plant is during its active growing season, usually in spring and summer. During this period, warmer temperatures and longer daylight hours support healthier root development and steady early growth. Propagating at this time allows new spider plants to establish more easily and lowers the chances of slow rooting or stress.
Tools and Supplies for Spider Plant Propagation
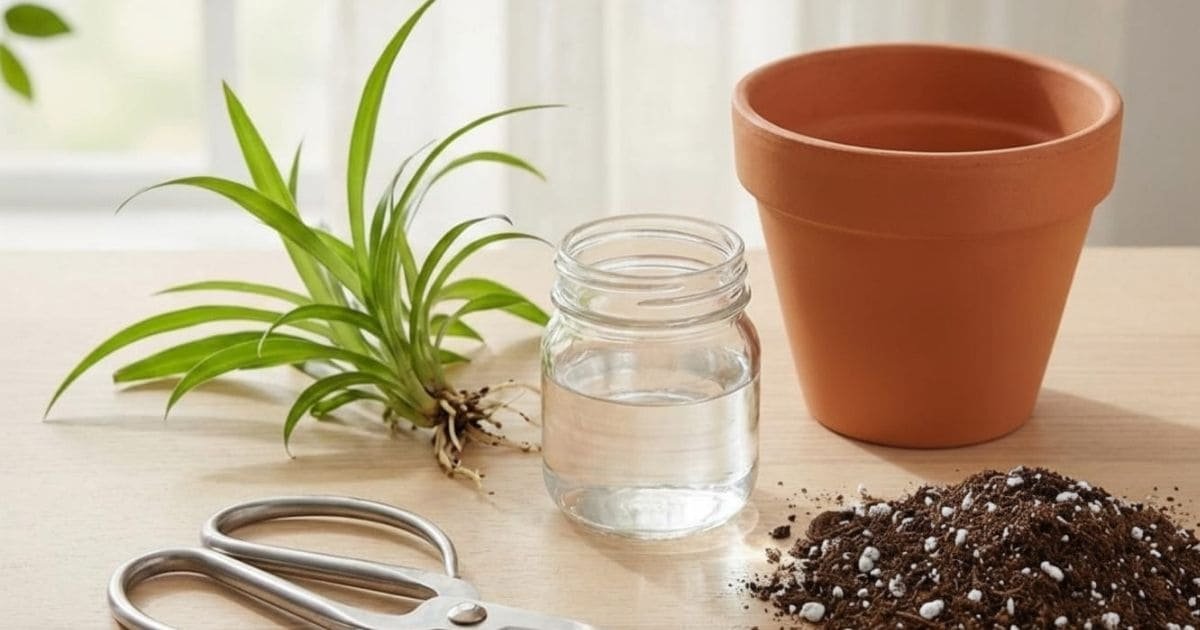
Basic Tools
Spider plant propagation does not require any special equipment, which makes it suitable even for beginners. Most of the tools needed are basic household items that help ensure clean cuts and healthy root development. Before starting, it’s helpful to have the following ready
➦Sanitized scissors
➦Sharp flower snippers
➦A clean jar filled with water
➦Well-draining soil mix
➦A planter with drainage holes
Best Containers for Water vs Soil Propagation
Using the correct container helps spider plant babies root faster and stay healthy. Both water and soil propagation work well, but each method requires a slightly different setup.
Containers for Water Propagation
Glass jars or clear cups work well for water propagation since they make it easier to see when roots begin to form. The container only needs to hold enough water to cover the root node, while the leaves should stay above the waterline. Refreshing the water regularly helps keep the roots healthy as they develop.
Containers for Soil Propagation
For soil propagation, small pots with drainage holes work best,a sizing approach also recommended in our snake plant repotting guide. A 4–5 inch planter prevents excess moisture and helps young roots establish properly. Lightweight plastic or terracotta pots paired with well-draining soil provide good airflow and stable early growth.
4 Proven Ways to Propagate a Spider Plant
How to Propagate a Spider Plant in Water (Step-by-Step)
Spider plant propagation in water means first allowing the spiderette to begin early root growth in water, a method also commonly used in snake plant propagation. Once the roots are well-developed, the plant is transferred to soil. This method is the fastest among all propagation techniques, but the roots of water-propagated spider plants are usually weaker than those of soil-grown plants.
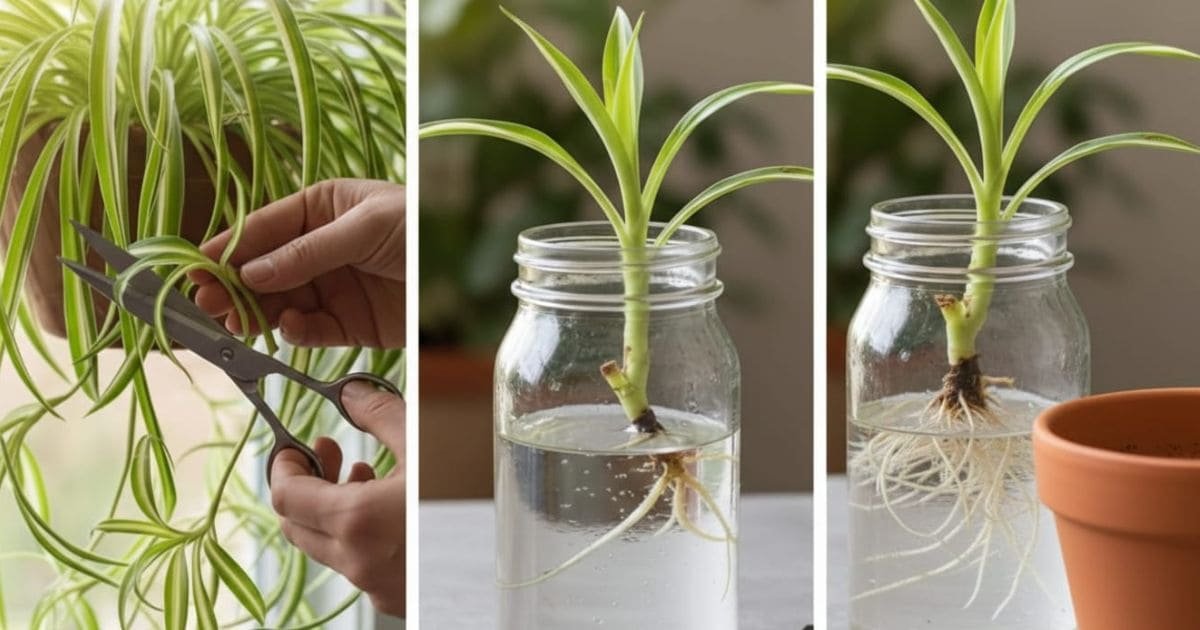
However, if you have limited time, this method works well. Follow these steps to propagate a spider plant in water:
- Use a clean glass jar and fill the jar with fresh, room-temperature water.
- Select healthy spider plant babies (pups) attached to the mother plant. Cut spiderettes gently with clean scissors.
- Place the spiderettes in the jar so the root node stays submerged in water.
- Keep the jar in a suitable atmosphere (a warm spot with good air circulation)
- When spider plant roots begin to form, choose a small pot with drainage holes to support healthy growth.
- Use a well-draining soil and fill the pot carefully with soil to support new roots.
- Place the planter in a spot that receives bright but filtered light for best growth.
How Long Does It Take for Spider Plant Roots to Grow?
Spider plant roots usually start developing within 7–14 days after propagation. Warmer temperatures and consistent indirect lighting can help speed up the process, while cooler conditions may slow it down. Once the roots reach 1–2 inches long, the plant is ready to be moved into soil.
When to Move Water-Propagated Spider Plant to Soil
A water-propagated spider plant is ready for soil once it develops several healthy roots about 1–2 inches long. At this stage, the roots are strong enough to support the plant upright. Transferring it too early can slow growth, so waiting until the roots are well formed helps the plant adjust more easily in soil.
Spider plant propagation in soil:
Spider plant soil propagation, also known as direct propagation, is a process in which we plant spider plant pups directly into their permanent soil. Unlike water propagation, this method requires patience, as it usually takes 2–3 weeks for the spider plant to root properly.
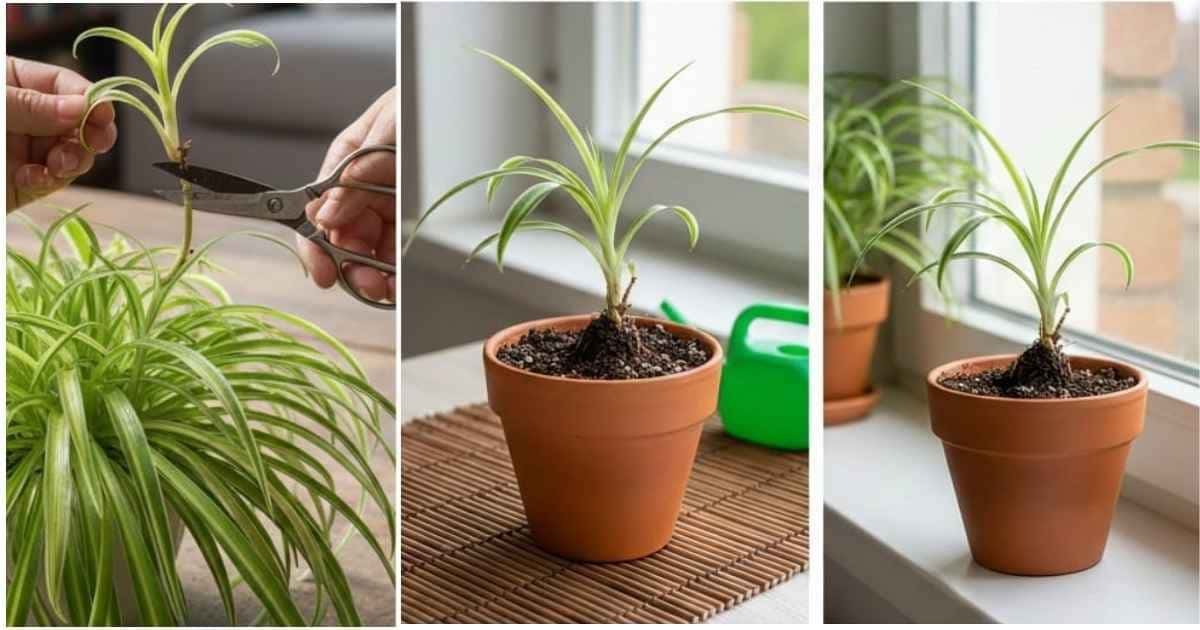
However, once established, roots growing in soil are thicker and more stable, making this method ideal for long-term growth. Here’s how to do it correctly;
- First, choose healthy spider plant babies from the mother plant. Then cut the Spider plant babies gently with clean scissors.
- Next, select a small pot with proper drainage holes. It is helpful to avoid waterlogging and root rot.
- After that, fill the pot with light, well-draining soil. It allows air to reach the roots more easily.
- Now, place the spider plant baby into the soil carefully.
- Then, water the soil lightly to make it evenly moist.
- Afterwards, place the planter in a warm and airy spot to encourage growth.
- Finally, check the spider plant roots after 2-3 weeks of proper care.
Why Soil-Grown Roots Are Stronger
Spider plant roots that develop in soil grow thicker and more stable because they adapt to natural resistance as they spread. This helps the plant anchor firmly, absorb nutrients better, and handle transplanting with less stress. As a result, soil-grown plants often establish faster and support healthier long-term growth.
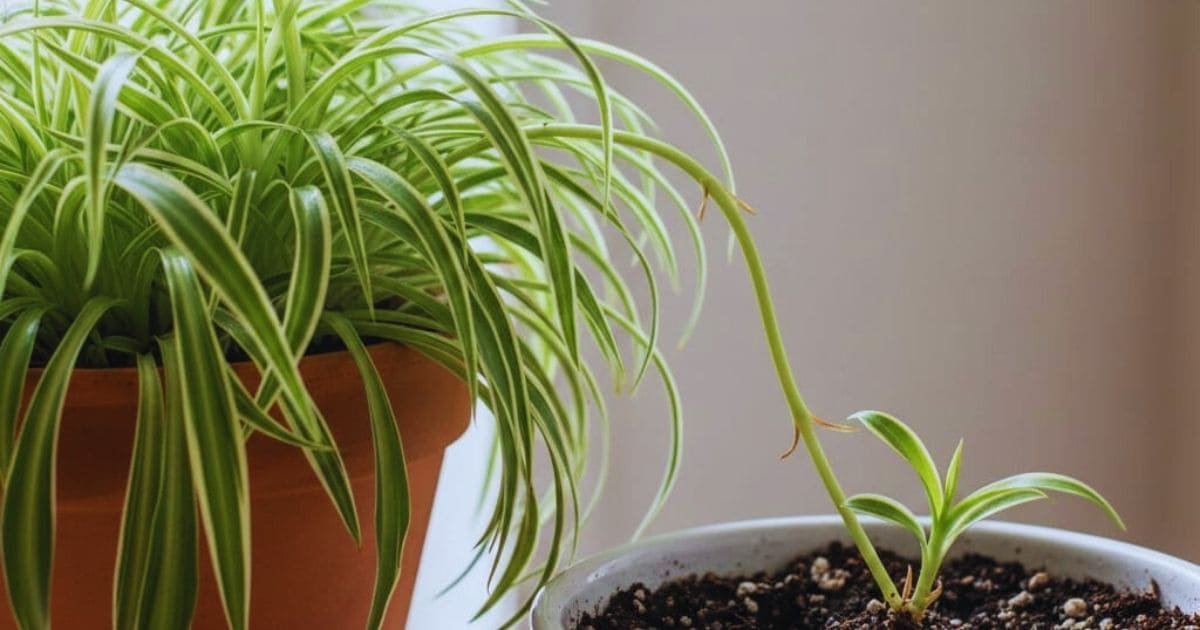
Spider Plant Propagation with stolon
Spider plant propagation via a stolon means planting your spiderette in another pot while it is still attached to the mother plant by the stolon (runner). This method is often preferred because it has a very high success rate and produces more vigorous young plants compared to cutting the spiderette off first and rooting it in water or soil. The step-by-step guide for soil propagation with stolon is given below:
- Select a breathable pot that helps prevent excess moisture buildup.
- Fill the planter with airy and well-draining soil that allows water to pass through the soil easily.
- Now, place the spiderette on the soil.
- Lightly moisten the soil to encourage faster growth, so make the soil moist
- After a few weeks, gently tug the spider plant baby to check the spider plant roots. Its firmness indicates that roots have developed well.
- Once the roots are established, cut the stolon from the mother plant and let the spider plant baby grow independently.
Spider Plant Propagation by division
Spider plant propagation by division involves separating a mature, healthy plant into two or more sections, ensuring each section of divisions has its own healthy roots (and leaves), a technique commonly recommended in detailed snake plant maintenance guide. This method is best for large, established spider plants and gives you instant, full-sized plants, unlike stolon propagation, which starts with small plantlets. The process of propagating the spider plant by division is mentioned below
- Gently take the plant out to avoid the risk of damaging roots.
- Carefully divide the rootball into healthy sections, ensuring each section has roots and shoots.
- Select a pot with drainage holes to avoid waterlogging.
- Fill the pot with well-draining soil to support new growth.
- Now, place the rootball in the soil.
- Make the soil lightly moist but avoid soggy soil.
Is it Possible to Propagate Spider Plants Without Babies?
Yes, it is possible to propagate spider plants without babies. Spider plants can be propagated by division or by seed, depending on the plant’s structure and maturity, much like the growth patterns discussed in different snake plant types. Among these methods, division is the most effective and reliable because it involves separating the rootball of a mature plant into healthy sections.
Each divided section already has established roots, allowing it to grow into a large, healthy plant within a few weeks. Although spider plants can also be grown from seeds, this method requires extra care, patience, and time, making it less commonly used.
Will Spider Plant Babies without roots grow?
Yes, spider plant babies without roots can grow successfully. Propagation involves encouraging these babies to develop roots, which can be done using water or soil methods. With the proper propagation technique, new root development usually begins within a short period.
Tips to Encourage Root Development
To encourage Root development, provide the Spider plant babies a suitable Atmosphere including bright indirect light, consistent moisture, warmth, and proper airflow.
➦Place spider plant babies in bright, indirect light to support steady root growth.
➦Keep moisture consistent but not excessive, as roots develop best in lightly damp conditions.
➦Maintain a warm environment, since cold temperatures slow root formation.
➦Ensure good airflow around the plant to prevent rot and stagnation.
➦Avoid moving or disturbing the plant frequently while roots are forming.
➦Be patient as healthy roots develop gradually rather than overnight.
Can Spider Plants Grow From Leaves?
It is a myth and cannot grow from a leaf cutting alone because leaves do not contain growth nodes.
Spider plants only propagate Spider Plant babies (spiderettes), division, or by seeds. So, without roots or nodes, a single leaf will never develop into a new plant.
Can You Grow a Spider Plant From Seed?
Yes, spider plants can be grown from seeds; however, seed propagation takes significantly longer than growing spider plants from pups. Seeds require consistently moist soil and warm temperatures to germinate successfully. In contrast, spider plant pups establish faster and produce more reliably. For this reason, most gardeners prefer vegetative propagation over seeds.
Why is seed propagation uncommon?
Spider plant propagation from seed is uncommon because it requires extra care and is less reliable; spider plant babies grow much faster and stronger.
When and How to Replant a Propagated Spider Plant
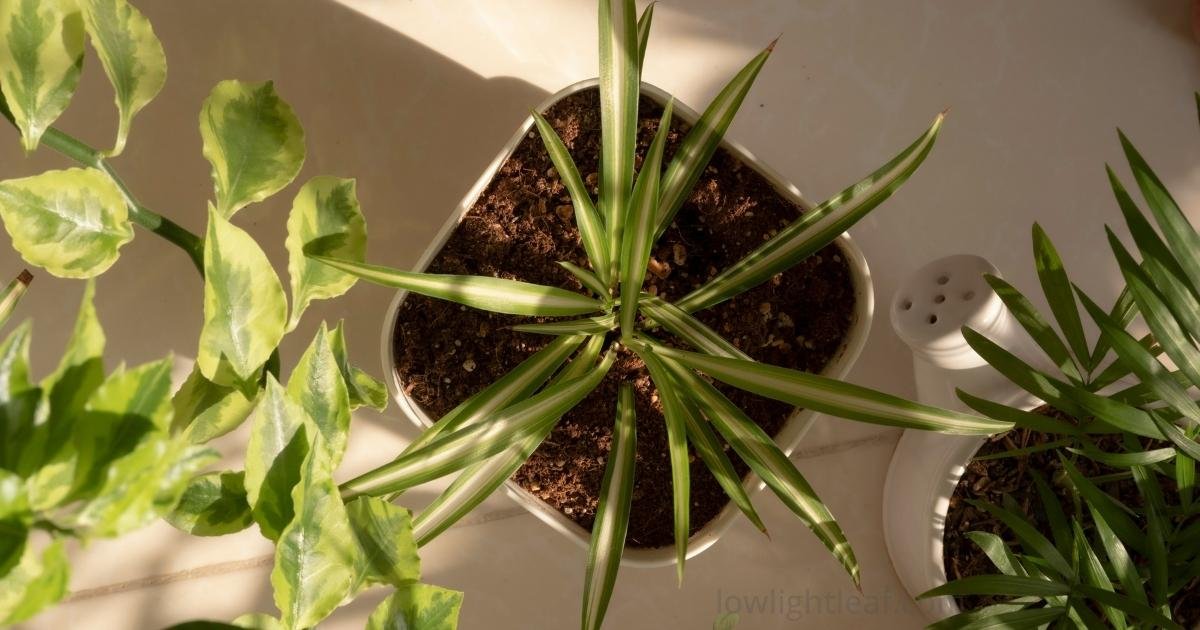
Replanting a spider plant means transferring it to its permanent pot once propagation is complete. During propagation, a small 4-inch pot is typically used to encourage root development. Once you inspect the roots and notice healthy, well-established growth on your young spider plant (often called a mini airplane plant), it is time for replanting or transplanting.
When to Replant a Propagated Spider Plant
Replant your spider plant once strong white roots are 2–3 inches long, as this ensures better soil establishment and faster growth.
Transplanting Spider Plant
Transplanting Too early can slow growth. Gently move the plant into a 7-inch pot filled with well-draining soil. Keep the soil slightly moist and place the plant in bright, indirect light to help it adapt smoothly to its new environment.
Signs Your Spider Plant Is Ready to Be Replanted:
Look for the following growth indicators before replanting:
➦Visible healthy root development
➦fresh green leaves
➦steady and consistent new growth
How to Care for Baby Spider Plants After Propagation
After propagation, young spider plants need gentle care to settle in. Keeping conditions stable helps new roots strengthen and supports healthy early growth.
Light Requirement
Baby spider plants grow best in soft, indirect natural light, similar to the conditions explained in snake plant light requirements. Soft light encourages steady growth without stressing tender leaves. Avoid direct sunlight, as it can scorch young foliage and slow recovery. A bright spot near a window, away from harsh sun, works best.
Watering Schedule After Propagation
During root formation, water thoroughly to keep the soil consistently moist, as spider plant roots develop quickly in damp conditions. Avoid soggy soil to prevent root issues.
Mistakes to Avoid
Common Mistakes during propagation include:
➦Placing the plant in direct sunlight.
➦Letting the soil dry out completely before watering.
➦Overwatering
Common Spider Plant Propagation Problems & Fixes:
Spider Plant Cuttings Not Rooting
Reason: Dry conditions or direct sunlight can prevent root development.
Solution: When propagating in water, keep cuttings in a humid environment with indirect light. In soil, ensure consistent moisture and indirect sunlight; roots typically form within 2 weeks.
Yellowing or Wilting Baby Plants
Yellowing or wilting baby plants is a common issue during propagation and often relates to broader indoor plant leaf problems caused by watering or light stress.
Reason: It can be caused by improper watering and sudden changes in light.
Solution: Provide bright, indirect light and water only when the topsoil feels slightly dry.
Root Rot Issues
Reason: Overwatering causes soft, mushy, or blackened roots.
Solution: Remove the plant from the pot, gently wash off all soil from the roots, and repot the healthy roots in fresh, well-draining soil and a pot with drainage holes.
Final Tips for Successful Spider Plant Propagation
For better results, always use well-draining soil, place plants in bright, indirect light, water only when the soil is slightly dry, and be patient; healthy roots take time to develop. These simple habits can guarantee you a higher success rate.
➦Always start with healthy spider plant babies that have firm leaves and a visible root node.
➦Keep moisture balanced during propagation; roots grow best in damp conditions, not soggy soil or stagnant water,a principle closely linked to maintaining proper indoor watering habits.
➦Place new plants in filtered or indirect light to support root development without stressing young leaves.
➦Maintain a warm and stable environment, as sudden temperature changes can slow rooting.
➦Allow roots to develop fully before transplanting, especially when propagating in water.
➦Gradually move young plants into the soil, giving them time to adjust.
➦Avoid overwatering, frequent repotting, or constant relocation, as these interrupt root formation.
➦Be patient, healthy spider plant roots take time, but steady care leads to strong growth.
With stable conditions and a little patience, spider plants usually respond well and reward you with steady new growth, especially when placed among other low light plants that thrive indoors.
FAQs for Spider Plant
Can spider plants grow from cuttings?
Yes, spider plants grow easily from spiderettes (babies), which act like natural cuttings. These plantlets already contain growth nodes, allowing them to develop roots quickly when placed in water or soil under proper conditions.
Is it better to propagate spider plants in water or soil?
Both methods work well, but each has its benefit. Propagating spider plants in water allows you to clearly observe root growth, while soil propagation helps reduce transplant shock and supports stronger long-term root development.
How long does it take for a spider plant to propagate?
Spider plant roots usually begin forming within 1–2 weeks. After planting, new leaf growth appears shortly afterward when the plant receives bright, indirect light and consistent moisture.
Do spider plants need sun?
Spider plants prefer bright, indirect sunlight for healthy growth. Direct sun can scorch the leaves, while low-light conditions may slow overall development.
Are spider plants hard to propagate?
No, spider plant propagation is very easy, even for beginners. With simple steps and basic care, spider plant babies root quickly, making them one of the easiest houseplants to propagate.